Art
Computing
Contact info
CV
Electronics
Geek culture
Home brewing
Math
Music
Physics
Rants
Ψ/Φ
Style
Teaching
Theatre
WHAT'S UP

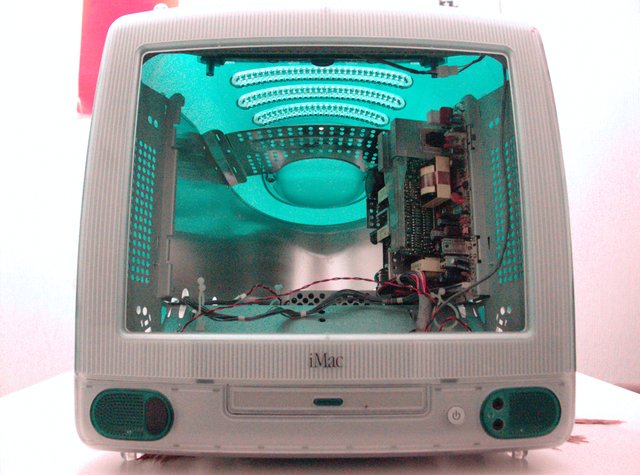
I spotted this beauty in a University throwaway pile on Thursday evening, 2008-05-22. Next day I grabbed it home. Maybe not for any serious use, but at least to learn something about PPC machines. I'm currently [2008-06-06] installing Gentoo on it.
[2008-06-10] Installed 2 SODIMMS of 256 MB each to replace the 32-MB pieces. The machine only recognizes half of it. A little more testing reveals that it finds half of each SODIMM separately. I'm not really surprised after many sources pointing out how picky the iMac G3s are with RAM. There are some models explicitly tested for iMacs, which I don't think are worth the price in my case.
[2008-08-07] I've used the machine mostly as a headless box, using the "Basic VGA Adapter" from a helpful page. I've given up the idea of donating this as a web/office machine, because of the many shortcomings compared to more modern machines. IDE drives in particular are a pain to use, as the controller seems to lack UDMA altogether. Instead I'm keeping it to learn more about PPC, and I decided to ditch the heavy, noisy and power-hungry monitor section.
Following these disassembly instructions and going beyond, I've removed the CRT and its support circuits. Fortunately, the power supply works independently, though it does generate some unused voltages like 130 and 75 V :-P
For cooling, I naturally fancy a passive system, but here I settled for a lower fan voltage. Passive cooling is of course a future option, and the fan probably helps maintain the power supply too. Since the fan was originally powered via the monitor circuits, I had to find another supply, and I found a nice 5 V point on the PSU labeled "T5V". It was on the cable powering the monitor, conveniently next to GND. Oddly enough, the fan is always on as the PSU is plugged in; this won't bother me, as I'd unplug the machine when offline anyway.
There is another 5-volt pin at the other end of that connector, labeled "PC5V", that is more logically powered only when the computer is on. However, the PSU is less whiny when using the always-on T5V.
The machine seems unable to boot without a monitor attached. Fortunately, the aforementioned VGA adapter does the trick, even without an actual display.
The infrared port works with my Nokia 6110 phone, using Gnokii. The kernel driver is pmac_zilog, from the serial port section. I've tried various IR dongles with other machines, and this is the first one that works with my old handset :) These are the parameters I've changed in /etc/gnokiirc:
port = /dev/ttyS1
model = 6110
connection = infrared
The modem and the infrared port are visible as serial ports, with the pmac_zilog driver. The IR port is in fact connected via a cable that seems like an ordinary Mac serial cable -- there goes the "legacy free" claim ;) I should try this with my old HP 870Cxi printer that has the equivalent connector, if I manage to find a longer cable.
[2009-09-04] For a long time I have been considering a passive cooling mod, since the CPU is not a huge power consumer. The stock heatsink is so tiny it's stupid, and in fact Apple did put a bigger fanless sink into later models. I also had a spare PicoPSU lying around, and it would be a nice complement to the silenced CPU; the stock PSU is huge and complex, as it also provides power for the CRT.
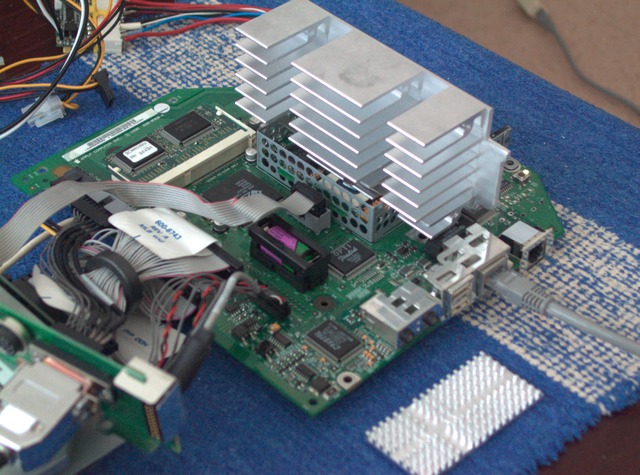
One of the main challenges was finding a suitable heatsink. The CPU was snugly embedded in its cage, with little horizontal space around it. I also did not want to modify the existing CPU board setup, partly because the cage does provide a way of mounting a heatsink. I ended up using a Slot 1 cooler sideways, so that the bottom-centre fin is pressed against the CPU — using the stock mounting bar. I had to saw off a few corners of the heatsink to fit it around the cage.
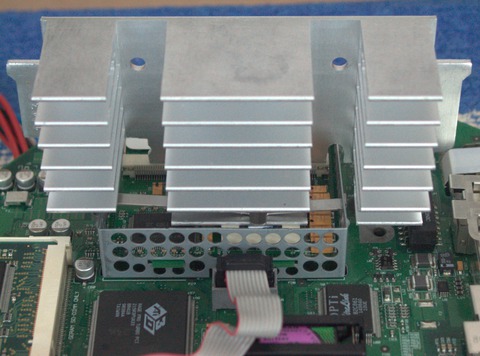
 For comparison, the original heatsink is in the foreground.
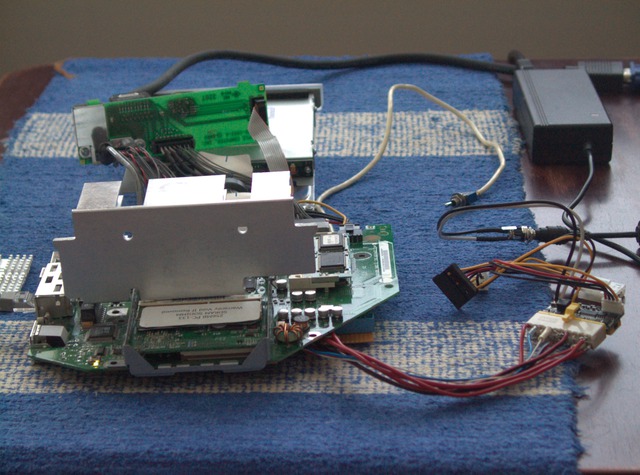
The ATX power adapter was built using the pinouts from Radiomods. This is a generally useful page, if you can ignore the confused usage of IDE vs. ATAPI. The adapter plugs directly into the underside of the motherboard, omitting the power filter.
I did not manage to get an inverter working; I did try a transistor one using a BC238, and an IC one using two NAND gates of a 74LS00 in parallel. As some people have commented, power supplies are quirky, and many combinations of a PSU + inverter do not work, while others do. In my case, the common problem was having the power on without having pressed the button, but afterwards power was down. I do have some experience in electronics, and I do not believe all of my designs went completely wrong. So for now I only have a mechanical switch, which is good enough for this quick and dirty hack.
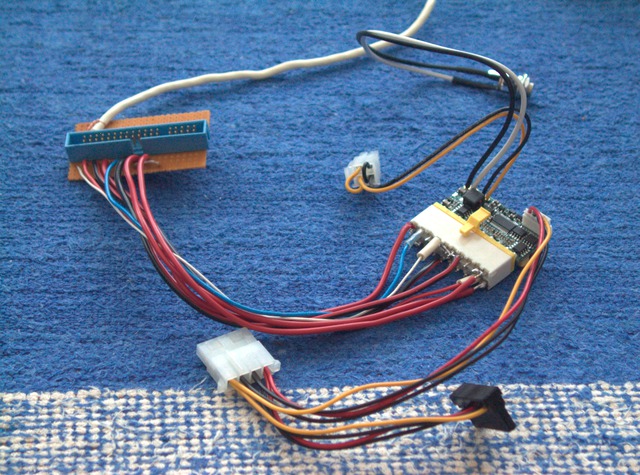
Note that many of the pins at the ATX connector are left unconnected; there is a lot of redundancy in both ends. I only doubled up the ground, to make sure it can carry enough current. However, I found it important to connect all of the pins at the motherboard end correctly. For example, the lonely 5-volt pin 1 supplies power to the hard drive connector, and it is not connected to the other 5-volters 5,6,7,8 on the mobo.
I think the most foolproof inverter would be a mechanical relay, or a modern solid-state equivalent. I did not have any around, though. I did consider using a thyristor, but it only works for the initial power-on, so it is not much better than the mechanical switch.
With a heatsink protruding above the CPU cage, it is impossible to mount the system in the original case location. Currently the mobo and other components are lying about in an open shelf. In case I decide to encase it, a slow and quiet fan would probably be in order. I have neither a case available nor any other immediate plans, but I am thinking of mounting it all in the original mobo+drive caddy, to make it a more manageable unit.
After hours of full CPU load in a room temperature of 23 °C, /proc/cpuinfo tells temperatures ranging from 46 to 54 °C. It usually gives a 2-degree range, most commonly 50-52. I consider this a great success, since the original fansink cooled it down to 40-42 with an open case. Passive cooling generally gives much higher temperatures, and my heatsink is far from ideal, as the CPU is mounted on an edge fin.
[2009-09-05] The system is now mounted in the original caddy, and it worked out even better than expected. The empty space below the motherboard was huge, enough for the PicoPSU. A spare screw-hole on the mobo was used for a light mounting of the PSU, and one of the many holes on the sides was suitable for the power switch. Unfortunately, there were no suitable holes for the PicoPSU 12-volt socket, but barring that the setup is pretty clean.
It is also hauntingly quiet, as I moved the root partition to a USB stick. The machine cannot boot off the USB, but it is enough to have the kernel on a HD. The stick is not blazingly fast on USB 1.1 but for these experimental purposes it works great.